- WILD INSIGHT -
Venus
UTPR (Underwater Timed Picture Recorder) Operation Manual
|
Introduction |
The Venus UTPR System has two major components - The Venus Camera and the Orange Box docking station.
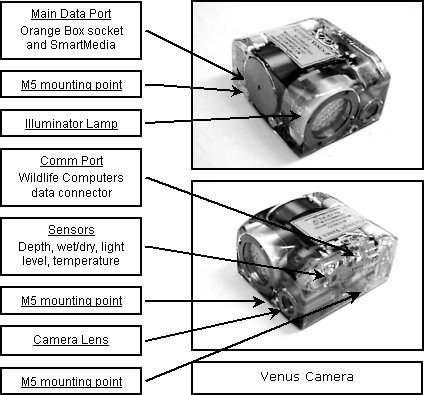
....There are two removable covers on the Venus Camera - the main data port has a large black metal one, and the Wildlife Computers comm port has a small white Teflon one. Inside the main data port there is a 2x20 way connector for the Venus Deployment Plug and for attaching the Orange Box to the Camera. The SmartMedia Card, which stores the picture files, is inserted into a slot within the data port. The largest card that will work in this system is 64Mbyte.
....In addition, a Wildlife Computers communications Blue Box is needed, and a PC with the latest MK9host software installed.
....An external power source is needed for setting up and for
recharging the system. Either 100-240VAC 47-63Hz 0.7A, or 12VDC 2A.
|
Setting up the recorder for deployment |
1. Make sure the camera is completely dry:
a. Thoroughly dry the outside of the camera with a paper towel
b. Use paper towel to mop up any dribbles of water that may be trapped
around the edge of the data port as the cover is removed
c. Keep the camera on its side while removing the data port cover to
stop any trapped water running back into the data port
2. Remove the data port cover:
a. Remove the 2 retaining screws put them somewhere safe
b. Attach the long handle to the cover
c. Remove with a straight pull and slight rotation
3. Remove the Wildlife Computers comm port plug:
a. See Wildlife Computers Mk9 Instruction Guide
b. Remove the white plug
c. Keep the plug clean and put it somewhere safe
d. Blow out any water
4. Remove the deployment plug if necessary:
a. Attach the short handle to the plug
b. Remove with a straight pull and very small gentle rocking motions
c. Keep the plug clean and put it somewhere safe
5. ....Make sure that a 3.3V SmartMedia Card is inserted in the slot below the 2x20 way connector; the gold contacts on the card must face away from the connector
|
|
|

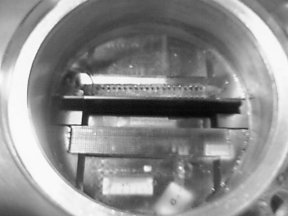
Inserting SmartMedia Card - gold contacts away from the 2x20
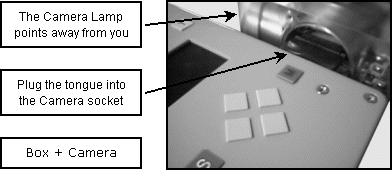
6. ....Place the Orange Box on the lower part of the Black baseboard
7. ....Place the Camera on the raised part of the baseboard. Turn it so that the Lamp is pointing away from you and its data port is facing the Orange box connector tongue.
8. ....Slide the camera across the
baseboard so that the Orange box connector tongue plugs firmly into the 2x20
way socket in the Camera data port. Make sure that the tongue is fully seated
into the socket.
(Check: no LEDs should be illuminated at this stage).
9. Plug the 12V power cord into the Orange box, and the box will work through its start-up sequence:
a. Power Red-LED (left hand red LED) flashes for 45 seconds
and then stays on. The flashes indicate that the system is 'BUSY' checking the
SmartMedia Card for errors, then programming the Camera with whatever actions
are currently 'set'.
b. The Display Screen shows whatever the Camera can see now, with screen
indicators showing which modes are set. If the CLOCK menu is displayed: set it
(changing the day anyway if it seems "stuck"); press 'M' to EXIT;
then press 'I' to restart.
c. Press the 'Left' direction button to show the PIX_RATE (time between
still pictures) setting. The Power Red-LED flashes once for each 3 second
multiple.
d. Press the 'Right' direction button to show the OFF_DELAY (time taking
pictures or time waiting before turning off) setting. This time the Camera LED
flashes once for each 1 minute multiple.
The Battery Red-LED (right hand red LED) turns on if the battery needs charging. And the Battery Green-LED will turn on when the battery is fully charged.
10. ....You can now use the buttons to set-up the system. The various buttons, LEDs and connectors on the Orange box are identified below.
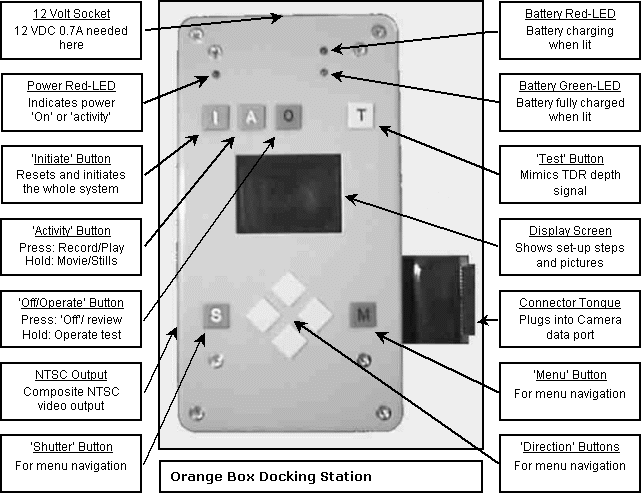
Button 'I': 'Initiates' or resets the Orange Box. This repeats the start-up sequence. It can be pressed at any time since it over-rides the rest of the system.
Button 'A': Selects the 'Activity'. One press toggles between 'record' and 'playback'. Press and hold toggles between 'movie' and 'stills'.
Button 'O': Will either turn 'Off' the Orange Box:
- One press in 'playback' mode will flash the Power Red-LED
then turn the box 'Off'. The Power Red-LED will remain lit if 12VDC plugged in.
Battery charging will continue if needed.
- One press in 'record' mode after the initial start-up sequence will also turn
the box 'Off'. Battery charging etc. continues.
Or it will start the next 'Operation':
- If any settings have changed then it repeats the start up sequence. Once you
are sure that the sequence is correct, pressing the 'O' button again will save
the changes into the Camera and turn the box off.
- At the 'Off' stage, holding the 'O' button down until the Power Red-LED stops
flashing and stays lit will switch to a 'test-mode'. In this mode the Camera
LED will show what is going on (see Protocols below), and the 'T' button will
be active.
Button 'T': Mimics the Wildlife Computers TDR indicating that the Camera is within the programmed depth range. Press and hold to remain 'at depth', release to go 'shallow' (or 'too deep').
Button 'S': is the 'Shutter' button, which will be needed to make particular choices in the set-up menus. It will also take pictures while the Orange box is connected to the Camera.
*******************************************************************************************************************************************************************
This is an example of part of the manual: a full PDF copy of the latest manual
is available here.